Division KELLER
Please choose your language:

Two-colour pyrometers

Principle, advantages, limitations and applications of two-colour pyrometers in thermal processes

Introduction

Nowadays, temperature measurements are not imaginable without two-colour pyrometers to cover a part of the many applications for infrared thermometers. The following article explains physical principles, advantages, functional and analytical possibilities but also limitations of two-colour pyrometry. Practical applications demonstrate typical areas of use.

Measuring principle

A two-colour pyrometer detects the thermal radiation of a measuring object at two different wavelengths. The ratio of the two spectral radiances φ varies almost proportionally to the temperature. Connected to the spectral radiances is the respective emissivity ε of the measuring surface for these two wavelengths (Fig. 1).

In order to minimise the wavelength-dependent influence of the emissivity emitted from the measuring surface, wavelength bands that lie close together are chosen for this purpose. This means on the other hand that the two radiances hardly differ from each other. The ratio of two nearly identical values varies only slightly in relation to the object temperature. The lowest measurable temperature of a two-colour pyrometer is therefore limited to approximately 300 °C. A large amplification factor is needed to be able to interpret these small signal changes at all. For this reason, highest demands have to be applied to the quality of the sensors, the electronic amplifiers and the A/D converters to achieve a high signal to noise ratio, i.e. a small NETD (noise equivalent temperature difference) and thus a high temperature resolution that is required for a precise measurement. To verify the NETD value, it is necessary to adjust the pyrometer’s lowest temperature threshold to the shortest response time while checking the stability of the measuring signal.
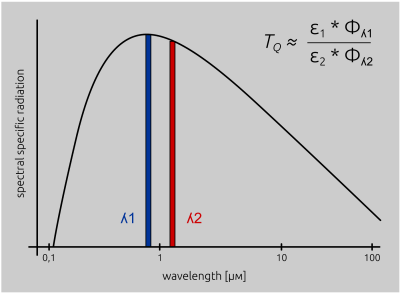
Two-colour pyrometers measure the radiation at two wavelength ranges and determine the temperature from the ratio of the density of the radiation.

Fig. 1 Two-colour pyrometers measure the radiation at two wavelength ranges and determine the temperature from the ratio of the density of the radiation.


Advantages of a two-colour pyrometer

The big advantage of the two-colour measurement method is the determination of the correct temperature if a signal gets weaker independently of the wavelength. If, for example, a dirty inspection glass or steam, smoke and dust in the visual field of the pyrometer lead to a degradation of the signal, the ratio and thus the displayed temperature will nevertheless remain constant. 

With the emissivity ε1 = ε2 being equal (grey body) for both wavelengths, the term for the emissivity is cancelled out from the equation, and the two-colour pyrometer shows the true temperature no matter what the emissivity of the target object is. Even when the emissivity of the target object varies to the same extent at both wavelengths, the measurement result will not be changed. Deviations from the true temperature as a result of constant differences between the two emissivities can be corrected by setting the emissivity ratio on the pyrometer.

Influence of a wavelength-dependent signal change on the two-colour temperature

But how does a two-colour pyrometer react when measuring a non-grey body where the emissivity variations are different at both wavelengths, either due to the surface finish or as a function of the temperature?

The same selective effect appears when thin deposits (e.g. oil films or vaporisations) change the transmission of the inspection glass differently at both wavelengths. Even two colour devices do not work completely independent of radiation characteristics emitted from the target object, though it is sometimes stated otherwise in the literature.

The three examples (see table 1) illustrate the varying effects of emissivity-dependent signal attenuation on measurements with singlel and two-colour pyrometers. Based on a temperature of 800 °C of a "black body" with an emissivity ε = 1 and in accordance with Planck’s law, a non-equal variation of the wavelength-dependent emissivities for a two-colour pyrometer with λ1 = 0.95 µm und λ2 = 1.05 µm would result in the following temperature values (table 1).
 
Influence of an emissivity-dependent attenuation for the one-colour and two-colour method of measurement.

Table 1 Influence of an emissivity-dependent attenuation for the one-colour and two-colour method of measurement.


It is evident that even small differences between the emissivity factors lead to a large deviation of the two-colour temperature. This deviation gets larger with a decreasing absolute emissivity value. In comparison to a spectral pyrometer, a two-colour pyrometer is a lot more sensitive to wavelength-dependent signal changes the larger the difference and the smaller the absolute value of the emissivity is.

The graph (Fig. 2) illustrates that the sensitivity in relation to the emissivity ratio is all the higher as the wavelength bands are closer together.
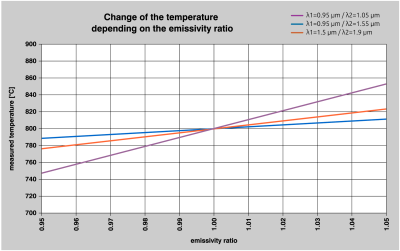
 
Influence on the displayed temperature with a changing emissivity ratio of the target object at different wavelengths, based on an object temperature of 800 ° C.

Fig. 2 Influence on the displayed temperature with a changing emissivity ratio of the target object at different wavelengths, based on an object temperature of 800 ° C.


This suggests that devices with a larger difference between the two wavelength bands supply more stable readings. Physical laws, on the other hand, dictate for metals that an increasing of the wavelength also leads to a decreasing increasing of the spectral emissivity of the measuring object (Fig. 3).

These two contrasting relations have to be considered when measuring with these pyrometers. As a rule, the recommendation to use devices with rather short wavelengths that lie closely together applies to two-colour pyrometers. Especially water vapour in the air may lead to significant measurement errors caused by atmospheric absorption bands when pyrometers with long wavelengths are used.
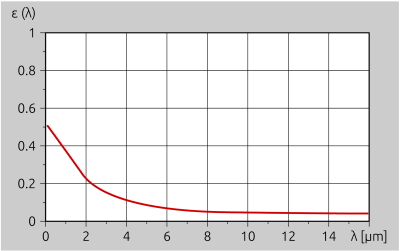
 
The emissivity of metals decreases with an increasing measuring wavelength.

Fig. 3 The emissivity of metals decreases with an increasing measuring wavelength.


When a signal is attenuated, a single-channel pyrometer always displays a too low temperature. The situation is different with a two-colour pyrometer. It may either display a too high but also a too low temperature, depending on whether the variations affect to a greater extent either the short-wave channel or the long-wave channel. 

An alignment of the device to the maximum target temperature does not work in the same way as with a single colour pyrometer. Modern two-colour pyrometers have the option to show the signal strength on the display. As with a spectral pyrometer, the device can then be aligned to the maximum temperature.
 
During a comparative contact measurement caution is usually advised when the thermocouple shows a higher value than the two-colour pyrometer. The reason for this is a wavelength-dependent influences. Nevertheless, is there another way for the user to determine possibly false measuring values? For this purpose, the signal strength can either be displayed or transmitted via interface to be recorded and evaluated in parallel to the measuring signals. The higher this value, the more reliable is the measurement. 

Even more significant is a parallel recording and evaluation of the two spectral temperatures and the ratio.

The smaller the fluctuations of the temperature difference between the two wavelengths λ1 and λ2, the more reliable is the ratio value. The following measurement curves show the behaviour of the measured values during a neutral attenuation of the signal through an inspection glass with a transmission of 93% and through a laminated glass window with a wavelength-dependent transmission (Fig. 4).
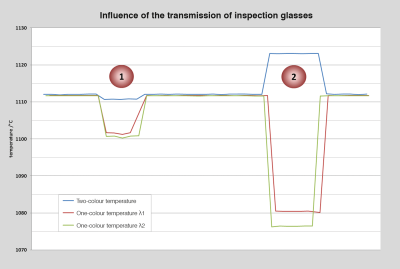
Comparative measurement of the temperature variation for a high-quality protective glass (1) and a low-grade laminated glass (2).

Fig. 4 Comparative measurement of the temperature variation for a high-quality protective glass (1) and a low-grade laminated glass (2).


The lower readings of the spectral temperatures are clearly visible when the protective glass (1) is used. The ratio value, however, remains almost constant. The curves for the low-quality laminated glass (2) show a significant and also irregular drop of the spectral temperature. A significant deviation of the measuring result is also visible for the ratio temperature.

When measuring through inspection glasses it is therefore imperative to use glasses that have a neutral transmission curve in the wavelength range of the two-colour pyrometer. It is easy to check whether a glass is suitable by holding it in front of the pyrometer during a measurement. The two-colour temperature measured through a suitable glass may only vary slightly.

Operation of the two-colour pyrometer when the measurement area is not filled by the target object

Another big advantage of two-colour pyrometry is the fact that the targets may be even smaller than the measurement area. A single colour pyrometer always needs a larger target area than its field of view, as a single colour pyrometer detects the average radiation value within the entire field of view. Otherwise, the measurement of a small object in front of a cold background would always produce a too low temperature.
When measurement area of a two-colour pyrometer is not completely filled by the target object, this has the effect of a neutral attenuation of the infrared radiation. Therefore, a two-colour pyrometer even produces correct readings when the target object is by up to 80% smaller than the measurement area of the pyrometer. The degree of minimum coverage of the measurement area depends on the emissivity and the temperature of the target object. Ideally, the position of the object could be anywhere within the measurement area and should not affect the temperature value. However, there are large differences in quality between the pyrometers offered on the market. Pyrometers with a simple optical structure, a marginal correction of optical aberrations of the lens and sensors with inhomogeneous sensitivity distribution may cause the reading to rise by 20 – 30 °C when, for example, a hot wire is located in the peripheral area of the measurement area, though the object temperature itself is still the same (Fig. 5).

The distinctly larger insensitivity of a two-colour pyrometer to correct alignment and focusing is another asset for measurements of small objects. A spectral pyrometer, in turn, must be clearly aligned and focused on the target object to avoid reading errors when the target object is only slightly larger than the measurement area.
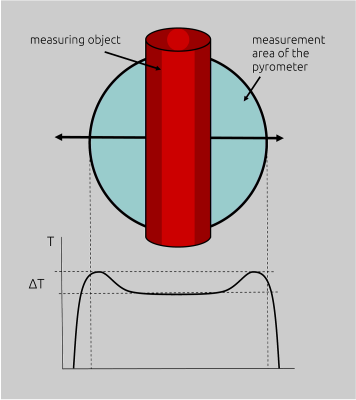
Incorrect temperature increase when the hot object is located in the peripheral area of the target spot (measurement with a two-colour radiation pyrometer with a low quality lens).
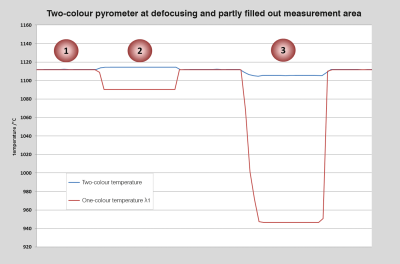
Fig. 5 Incorrect temperature increase when the hot object is located in the peripheral area of the target spot (measurement with a two-colour radiation pyrometer with a low quality lens).


The following measuring curve (Fig. 6) was recorded with a two-colour pyrometer with a field of view of Ø 8 mm directed at a target object of also Ø 8 mm. A spectral temperature was recorded in parallel. The fixed focal distance was 500 mm (measuring point 1). The measuring distance was then reduced to 250 mm (measuring point 2). Defocusing only had a small influence on the two-colour pyrometer while the spectral temperature deviated by approximately 20 °C. The measuring distance was then set to 1000 mm (measuring point 3). The measurement area of the pyrometer now was double the size of the target object. Again, the two-colour pyrometer displayed nearly the same values. The spectral value, however, dropped sharply due to defocusing and a too small target.
Influence of the measuring distance on the two-colour and spectral temperatures.

Fig. 6 Influence of the measuring distance on the two-colour and spectral temperatures.


Behaviour of two-colour pyrometers with inhomogeneous temperature distribution on the measuring object
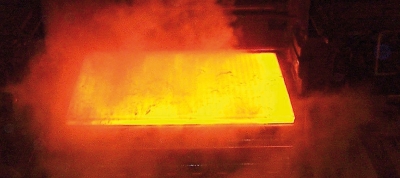
Temperature measurements of metal sheets and slabs in a rolling mill are made under extreme conditions and again and again the question arises as to what is the most recommended method? Is a single colour pyrometer or two-colour pyrometer more suitable (Fig. 7).
Frequent extreme measuring conditions in a rolling mill caused by water vapour and scales.

Fig. 7 Frequent extreme measuring conditions in a rolling mill caused by water vapour and scales.


For design and heat-relevant reasons the pyrometers are installed several meters away from the rolling mill. When using a standard optical system with a resolution of, for example, 100:1 the diameter of the measurement area would be 200 mm at a distance of 20 m. The presence of scales makes the temperature distribution on the slab extremely inhomogeneous. A single colour pyrometer would determine the temperature from the average value of the total radiation received in the measurement area. Therefore, the reading is dependent on the temperature distribution and on the presence of scales. As the slab is moving on the rolling mill, an unfiltered signal evaluation would produce a fluctuating measuring value. Under these conditions, pyrometer manufacturers recommend a pyrometer with a very high optical resolution of >200 : 1 to obtain the smallest possible field of measurement. The peak picker function detects the highest temperature at the spots not covered by scales. 

But how does a two-colour pyrometer react on an inhomogeneous temperature distribution in its measurement area? The behaviour of a two-colour pyrometer under inhomogeneous temperature distribution conditions is by all means more complex. It depends on the total area of the "hot spots" and the temperature differences between the hot and cold spots in the measurement area. The ability to measure target areas that are not entirely filled by the measuring object described above makes the two-colour pyrometer detect the temperature of the hottest spot in the measurement area in case there is a significant temperature difference of >200 °C between the hottest and coldest areas. 

When measuring slabs, the presence of slag could create several hot spots in the measurement area. If the temperature difference is small, the two-colour pyrometer also determines the temperature from the average value of the incoming radiation. Therefore, the recommendation is a two-colour pyrometer with a high optical resolution and good imaging qualities to minimise the influence of inhomogeneous target areas with the peak picker function. 

It is also particularly to use a two-colour pyrometer if water vapour and dirt is expected during the hot rolling process. The contamination detection function of the two-colour pyrometer also increases the operational safety of the measuring data acquisition.

Two-colour pyrometers to measure cooler objects in a hot furnace atmosphere

An often discussed topic is the temperature measurement of cooler objects within a hot furnace. Cold forgings are put into hot furnaces to be heated up or cold slabs pass the different heating zones of a pushing furnace. The high background radiation of the hot furnace wall is reflected by the measuring object and consequently also detected by the pyrometer, and the temperature displayed by the pyrometer is therefore always too high. The closer the temperature of the workpiece approaches the furnace temperature, the smaller are the interferences that affect the measurement. The most effective solution to eliminate background radiation is to use water-cooled sighting tubes. The costs for such an investment, however, are high and entail continuing operating costs. In addition, the installation of a tube within a furnace where the tube protrudes almost to the workpiece could be technically difficult or impossible to implement. 

The pyrometers are therefore often used without a sighting tube in the full knowledge of more or less severe measurement errors. The influence of the background radiation can be reduced when the temperature of the background radiation is separately detected by a thermocouple or a second pyrometer and the reflective interference radiation is mathematically corrected by the pyrometer software. This correction may be subject to uncertainty, in particular when the emissivity of the object is small, fluctuating or not precisely known. 

For reasons of physics, the rule "measuring with a wavelength as short as possible" applies to metallic objects to keep the emissivity influence as low as possible, but this observation is exactly the opposite when measuring cooler objects in a hot atmosphere. 

Background radiation has lesser effects on a device that measures in a longwave range. On the other hand, with a longwave spectral sensitivity, the emissivity ε of metals is smaller and thus the rate of reflection σ larger (ε + σ = 1). With varying emissivities, in turn, there is a higher susceptibility to interferences caused by the hot furnace radiation. In this case, pyrometer manufacturers recommend devices with a spectral sensitivity of 1 – 2 µm to get an acceptable compromise.
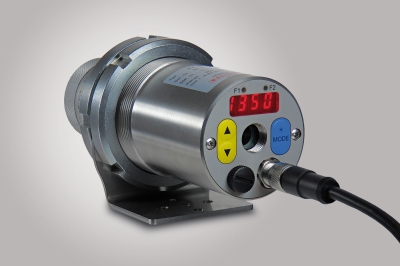
Again, the question arises as to how a two-colour pyrometer would react when measuring cooler objects in a hot atmosphere. In principle, the reaction of a two-colour pyrometer is similar to that of a spectral pyrometer. It detects both the radiation emitted by the object and the radiation reflected by the furnace wall. A two-colour pyrometer only reacts less sensitively when measuring through a dirty inspection glass or when dirt and smoke obscure the measurement area of the pyrometer. The reaction on varying emissivities extremely depends on local conditions and is therefore difficult to assess. During the start-up phase or even permanently, it is recommendable to record and evaluate both the two-colour and the spectral temperatures in parallel to have readings for possible analyses on hand. Modern two-colour pyrometers offer two analogue outputs to detect the two-colour temperature and also a spectral temperature directly at the control system. Another advantage of a two-colour pyrometer is the option to evaluate the signal strength as an indicator for the radiation properties of the measured object (Fig. 8).
Modern two-colour pyrometers display and transmit both the two-colour and spectral readings as well as the signal strength

Fig. 8 Modern two-colour pyrometers display and transmit both the two-colour and spectral readings as well as the signal strength


Two-colour pyrometers in power plants and incinerators

Due to the extreme measuring conditions like dust, steam and smoke in the sighting path and in consideration of technical and safety-relevant aspects, two-colour pyrometers are to be preferred for temperature measurements in power plants and incinerators. A pyrometer captures the radiation emitted by the target object in its field of view. In an incinerator, the energy received comes from hot particles in the airflow, but also from the opposite wall. At the same time, the measuring value is dependent on the density of the particles, the inhomogeneous temperature distribution and the temperature of the opposite wall. If the wall is distinctly cooler than the particles in the air flow because heat exchanger tubes are built into the wall, a single colour pyrometer that averages the received radiation energy displays a too low temperature and, in addition, the temperature varies in relation to the load status of the incinerator. Here again, because of its ability to measure far smaller objects that do not have to fill the measurement area and thanks to its peak picker function, the two-colour pyrometer is the better choice. Compared to widely-used traditional thermocouples, two-colour pyrometers offer a true alternative as they are not subject to wear or age-dependent drift. Nevertheless, two-colour pyrometers are very sensitive to flames within their field of view. It is absolutely essential to take this into account when choosing the place of installation.

The display of the signal strength serves to check the reliability of the measurement. Due to the often very small furnace openings with a diameter of only 20 – 30 mm and a wall thickness ranging from 200 – 400 mm, high-resolution devices with good imaging qualities should be used to avoid a constriction of the measurement area. To prevent it from "squinting", the pyrometer must be parallax-free; therefore, the geometrical and optical axes should also be identical. Depending on the customer’s configuration requirements and the accessibility of the place of installation, compact devices or pyrometers are equipped with a sighing option in the form of a through-the-lens-sighting system or with a video camera during the start-up phase and during continuous operation to check in a fast and easy way whether the device is correctly aligned and the sighting path is free.

From a safety point of view, it is recommended that the contamination detection function of the two-colour pyrometer is used to generate an automatic alarm in case of excessive contamination or when the furnace opening is closing up.

Two-colour pyrometers for inductive heating systems
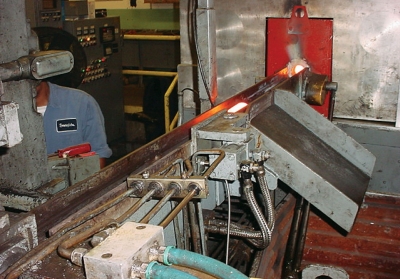
In their production process, billets go through a heating furnace before they are pressed to fittings. The temperature of this process has to be controlled to reach a consistent quality and to avoid faulty parts. Pyrometers are usually installed in inductive heating systems to detect the temperature of the passing workpiece within milliseconds and from a safe distance when the billet leaves the induction furnace. The temperature is used as a control variable for process control purposes and also to discard those billets whose temperature is outside the permissible range (Fig. 9).
Gate to discard billets with too high or too low temperatures.

Fig. 9 Gate to discard billets with too high or too low temperatures.


Both single colour and two-colour pyrometers are used to detect the temperature. The pyrometers are installed at a larger distances between 600 – 1200 mm. A prerequisite is a sighting aid in the form of a through-the-lens-sighting system or a spot light. This is the only way to set a correct focal distance and to provide ideal alignment in order to minimise possible reading errors caused by optical influences.

Depending on the structure of the machine, it is not always possible to set the correct focal distance, especially with pyrometers which have a fixed focal distance. When the pyrometers are firmly installed and the bolt diameters are always changing, the measuring distance varies as well, making it difficult to operate the devices at a correct focal distance.

Experience has shown that even devices with a focusable optical system often do not have a correct measuring distance to their target. The pyrometers are most likely not readjusted to changing bolt diameters which means that they again and again measure outside their focal point. 
To a certain extent, a two-colour pyrometer reacts considerably less sensitively to varying measuring distances, changing object diameters or measurements outside its focal range as described above and it is therefore more suitable for these applications than a single-colour pyrometer.
 
For this application, compact two-colour pyrometers with spot light (Fig. 10) are recommended to fulfil the two essential measuring requirements here in the best possible way: a) largely distance-independent and safe measurements and b) easy alignment checks.
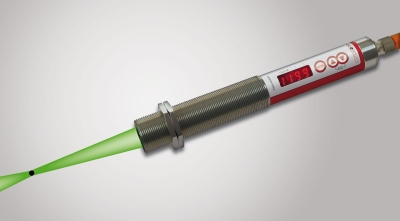
Compact two-colour pyrometer with LED spot light to display the exact size, position and focal distance.

Fig. 10 Compact two-colour pyrometer with LED spot light to display the exact size, position and focal distance.


Conclusion

Two-colour pyrometers with their described advantages are more than an alternative to obtain safe and stable measurement readings under difficult environmental and structural conditions in production processes with temperatures above 300 °C. The price difference of approximately 30 % compared to a single colour pyrometer with similar features is money well spent and quickly pays off considering fewer manual checks and a reduction of faulty parts. Under extreme measuring conditions, such as vapour, dirt and dust, the technical benefits of a two-colour pyrometer take full effect. It is recommendable to check the reliability of two-colour pyrometer measurements used for applications with varying emissivities of the targets.  

From a pyrometer manufacturer’s point of view, we can only recommended to make use of the additional protection and analysis features the two-colour pyrometer offers to increase process safety and to gain insights from the additionally provided temperature information.
INDICE 6 Login
© 2001-2024 – Internetagentur – Wrocklage Werbewerkstatt