Division KELLER
Please choose your language:

Principle, advantages and applications of new panorama pyrometers

Introduction

Pyrometers detect thermal radiation in a defined measurement area on the surface of a measurement object and calculate the temperature from these radiation values. Size and shape of the measurement area are determined by the pyrometer's lenses, its optical assembly and the sensor system. Due to their lens geometry, diaphragm system and sensor system, the devices available on the market usually come with a round field of view. Based on a novel optical design and high-quality lenses, some manufacturers have recently started to offer devices with a rectangular measurement area. The following article explains structure, mode of operation, advantages and applications of pyrometers with a rectangular measurement area.

Temperature measurement of moving objects
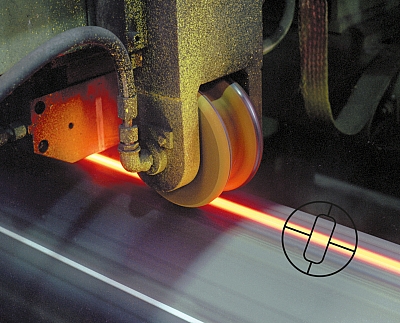
The idea to develop a pyrometer with a rectangular measurement area was born more than 30 years ago, as there are applications for non-contact temperature metrology that are easier and, above all, more reliably to solve with such a feature. Compared to contact measurements, temperature measurements with pyrometers have the big advantage that pyrometers are ideally suited to capture the temperature of a moving object. A prerequisite is of course that the target object lies within the measurement area of the pyrometer. However, the problems arise when the measurement object oscillates transversely to the direction of production and does not always completely fill the field of view, as the example from a wire production facility shows (Fig. 1).
A correct measurement can be made as long as the wire oscillates within the measurement area.

Fig. 1 A correct measurement can be made as long as the wire oscillates within the measurement area.


So far, single-channel pyrometers with a very small measurement area and an oscillating mirror mounted in front of the pyrometer were used to solve such application-related measuring problems. The rotating or oscillating mirror periodically deflects the target spot. The peak picker in the pyrometer captures the temperature at the time when the target spot is fully filled by the target object. In addition to a moving mechanism that is susceptible to failure, the data acquisition time is also limited. The scanning movement does not capture the target object temperature continuously but only cyclically. 

For these reasons, experiments were carried out many years ago with devices that created a rectangular measurement area by purely optical means. A special cylindrical lens spread the measurement area in the direction of an axis such as exists in a mirror cabinet. In principle, this method provided a solution to the problem. But an issue was also the uneven distribution of sensitivity on the measuring surface of the sensor. The high costs for this special lens were also a drawback. Furthermore, the pyrometers only worked with a fixed distance to the target spot. Another difficulty was the distorted optical image in the view finder which made it challenging to align the device correctly. 

Of particular interest is a rectangular measurement area for a two-colour pyrometer. A two-colour pyrometer detects the thermal radiation of a measuring object at two different wavelengths. The ratio of the two spectral radiances varies proportionally to the temperature. According to this measuring principle, the target object may even be smaller than the measurement field and, other than a single-channel pyrometer, the two-colour pyrometer yet detects the correct temperature of a hot object against a cool background.

Design and operation
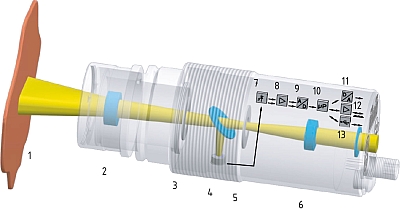
Unlike the cylinder lens solution described above, the new panorama pyrometer creates the rectangular measurement area with a high-precision aperture located in the measuring part of the detector between the aperture (3) and the deflecting mirror with sensor (4) (Fig. 2). The device does not need a specially shaped lens, and the view finder or the monitor (when the device is equipped with an integrated video camera) shows an image of the target object as sharp as usual when the focal distance is correctly aligned.
Block diagram of the optical arrangement of the panorama pyrometer: Target object (1), interchangeable lens with focal adjustment (2), aperture system (3) and sensor (4), target marking (5), eyepiece or video camera (6)

Fig. 2 Block diagram of the optical arrangement of the panorama pyrometer: Target object (1), interchangeable lens with focal adjustment (2), aperture system (3) and sensor (4), target marking (5), eyepiece or video camera (6)


Another advantage of this innovative optical structure is the correct display of the target marker in the view finder or on the monitor, both as to its exact position and its actual size in the rectangular measurement area. This is the only way to check and ensure a correct alignment of the pyrometer. 

We faced another optical challenge when developing the panorama pyrometer. Optical aberrations and an inhomogeneous distribution of sensitivity on the measuring surface usually have the effect on two-colour pyrometers that temperatures are measured quite differently depending on the position of the measuring object in the measurement field. At a target object temperature of 1000 °C the displayed temperature can rise by more than 30°C in the peripheral area of the field of view (Fig. 3).

Conventional two-colour pyrometers may also display varying temperatures when the target object diameter changes due to production-related processes and the measurement area is not uniformly filled. 
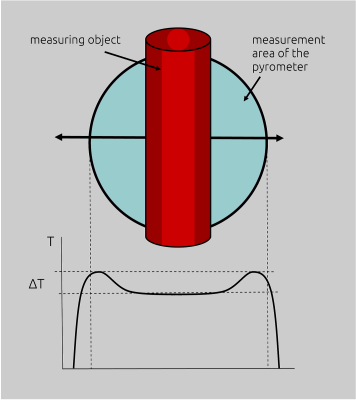
Incorrect temperature increase (measurement with two- colour pyrometers) when the hot object is located in the  peripheral area of the target spot.

Fig. 3 Incorrect temperature increase (measurement with two- colour pyrometers) when the hot object is located in the peripheral area of the target spot.


To minimize this physical effect, precision lenses were developed for the optical systems. These lenses have a consistently good imaging quality over the entire surface of the entrance aperture (minimum spherical aberration). Moreover, the lenses come with a minimum longitudinal chromatic aberration to achieve an equally sharp imaging both for the two measuring wavelengths and for the visible range. In addition, it was necessary to develop an optical system composed of precision lenses and to use high-precision sensors. The result is the new panorama pyrometer that supplies a steady measurement reading, for example, of a wire in the measurement area independent of the position and the diameter of the wire.

A variety of optical options

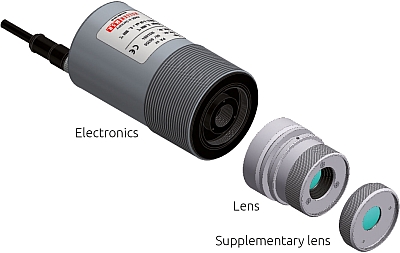
The modular design of the optical and electric components offers the option for panorama pyrometers as well to choose between several focusable objective lenses. A number of supplementary lenses attachable to the front thread of the objective lens are available to scale down the measurement field. This leads to numerous optical imaging variants both with regard to the desired distance to the target and the required size of the measurement area (Fig. 4).For example, wires with a diameter of 0.1 mm upwards can yet be detected.
The modular structure of the pyrometer, consisting  of electronics, interchangeable lenses and optional  supplementary lenses offers a variety of optical options.

Fig. 4 The modular structure of the pyrometer, consisting of electronics, interchangeable lenses and optional supplementary lenses offers a variety of optical options.


Simple alignment and high operational reliability
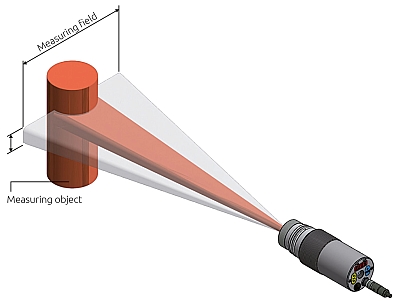
The optical alignment of a pyrometer on a small measuring object or to large measuring distances requires a high-quality mechanical adjustment system. Given these conditions, it is evident that devices with a rectangular target spot can be aligned much easier (Fig. 5). This advantage is particularly noticeable with a portable pyrometer when the operator holds the device in his hand and targets it at the object, as, depending on the model, the width of the rectangular field of view is by a factor of 3-7 times larger than with a device with a round field of view of similar size. This will ensure safe handling on the factory floor.
The alignment of the panorama pyrometer with  rectangular measurement area on small target objects  and large measurement distances is very easy.

Fig. 5 The alignment of the panorama pyrometer with rectangular measurement area on small target objects and large measurement distances is very easy.
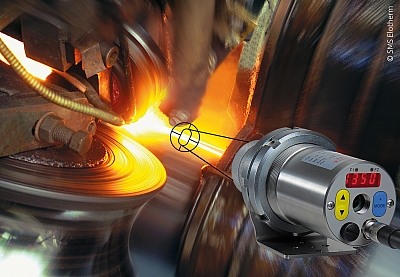

Reliable temperature measurement even when the position of the welding seam is varying.
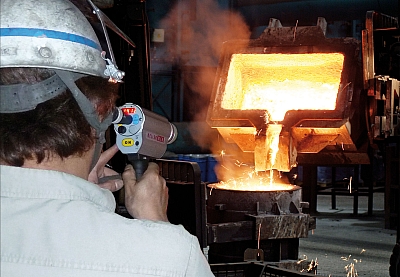
Fig. 6 Reliable temperature measurement even when the position of the welding seam is varying.


A portable panorama pyrometer measures the temperature during the pouring process.

Fig. 7 A portable panorama pyrometer measures the temperature during the pouring process.


Typical applications

The panorama pyrometer offers greater operational reliability and is much easier to align in production processes where the position and the size of the hot object may change, or in heat treatment plants where the heating zone at the workpiece varies. As a rectangular measurement area is much wider than a round one with the same size, the risk that the hot point moves outside the measuring field is much lower. 

A typical example is the production of endless tubes where the material is bent and welded together. The tubes are heated up with an induction coil. The position of the small welding point can vary and, with conventional pyrometers, the welding seam could at times be outside the field of view and a measurement would be impossible (Fig. 6). 

During the production of glass bottles the position and shape of the glass drop changes at the shearing blade. Here, too, a panorama pyrometer delivers a higher measuring reliability. Additionally, the material and the colour of the glass have an influence on the depth of visibility of the pyrometer into the partly transparent glass. This influence is greatly reduced by the ratio measuring method of the panorama pyrometer. 

Wires in wire drawing plants are undergoing a subsequent heat treatment as the wire runs with high speed through an Induction coil. It cannot be avoided that the wire oscillates between the guide rollers. Thin wires may oscillate within a range that is a number of times the diameter of the wire. Under these conditions it is no longer possible to make a selective measurement. 

The manual non-contact temperature measurement of liquid metal that is poured into a mould is made from a safe distance. It will be difficult to align a standard pyrometer with a round field of view to the pouring stream, especially when the position of the stream may change depending on the tilting angle of the ladle. A device with a rectangular field of view is much easier to handle in this case (Fig. 7).

Temperature measurements of tiny objects, such as a spiral-wound filaments or a heating element in an X-ray tube are a serious challenge for pyrometers. So far, such applications were mostly tackled with so-called intensity comparison pyrometers. These are pyrometers where the operator makes a visible check of the radiance of the target object and compares it to a reference radiation source (lamp) within the device.

The problem with electronically measuring pyrometers was to align the devices mechanically to detect extremely small target objects. Such measurement tasks can be much easier solved with the panorama pyrometer.

Limits of measurement

Due to the two-colour measuring principle the range of applications is limited to temperatures above 600 °C. Another limit is given by the degree of partial illumination (i.e. when the field of view is not completely filled by the target object) at which the two-colour pyrometer is still in a position to calculate a reproducible measurement value. 

This value also depends on the emissivity of the target object and on the absolute temperature. A two-colour pyrometer can already produce a reliable reading at the range beginning if the radiation energy amounts to 10% of the radiance of a black body at the same temperature. Larger signal attenuation is even permissible with increasing temperatures. Emissivity, the degree of partial illumination, the shape of the target object and visual obstructions such as vapour, dust and smoke in the field of view are all factors that contribute to an attenuation of the signal. We take a steel wire with an emissivity of 0.6 as an example. With a round target object we also have to take into account that the radiation captured by the pyrometer is to a certain extent reflected at a very flat angle. A safety factor of 1.5 is included as an approximation. The degree of partial illumination, the width of the field of view and the maximum measuring distance are calculated with the following formulas.

Degree of partial illumination = (minimum analysable signal strength ÷ emissivity) × safety factor

In relation to the above example, the target object must be filled at least by 10 % ÷ 0.6 × 1.5 = 25 % to allow the pyrometer to calculate a temperature reading. The signal strength serving as an indicator for the reliability of the measurement reading can be displayed on the pyrometer. 

For a wire diameter of 5 mm, this results in a maximum width of the field of view of 5 mm ÷ 0.25 = 20 mm at the range beginning.

With a panorama pyrometer, the optical resolution is indicated by the distance-to-target ratio (measuring distance ÷ size of measurement area) for the width DW and for the height DH. In relation to a distance-to-target ratio of, for example, DW = 40 : 1 the maximum measuring distance is 40 x 20 mm = 800 mm. Or, to put it another way: with the intended measuring distance being, for example, 500 mm, an objective lens with a distance-to-target ration of DW ≥ 500 mm ÷ 20 mm i.e. ≥ 25 : 1 should be used to ensure that the field of view is sufficiently filled by the target object.

You can also use the panorama pyrometer with the field of view being aligned longitudinally to the target object. This way, the pyrometer captures a larger surface of the target object compared to a pyrometer with a round field of view, and it can be used for wires with an even smaller diameter.

Pyrometer models
Pyrometers with panorama optics are offered for the stationary series CellaTemp PA and the portable series CellaTemp PT. Both models have through-the-lens sighting for correct alignment and focal adjustment of the device. The stationary CellaTemp PA is alternatively available with a colour video camera. This camera allows monitoring the alignment and the sighting path to the target object on a screen in the control room at any time. Together with the target marking, the video signal transmits and displays the measurement reading and the number of the measuring point. Thanks to the camera's special target brightness control (TBC) function, the radiation intensity is only captured in the measurement area and not, as it is usually done, over the entire field of vision of the camera. Thus, a small hot target object in front of a cool background is displayed on screen with optimum brightness and without clipping.
 
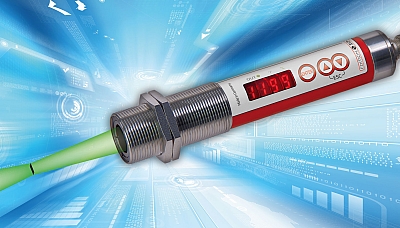
We recently put two models of the compact pyrometer series CellaTemp PKL with panorama optics (Fig. 8) on the market (image 8). These models are equipped with an LED spot light to verify correct alignment. In addition to the position, the spot light illuminates the real width of the measurement area, thus permitting easy and accurate alignment on the target object.
Compact panorama pyrometer with LED spot light.

Fig. 8 Compact panorama pyrometer with LED spot light.


Conclusion

For processes with temperatures above 600 °C where an alignment is difficult because the target is small or the distance is too large, or when the hot spot, i.e. the spot to be captured, is moving, the new panorama pyrometer is clearly superior to common pyrometers with a round field of view. The additional cost of approximately 25% is definitely money well spent due to the higher operational reliability.
INDICE 6 Login
© 2001-2024 – Internetagentur – Wrocklage Werbewerkstatt