Temperature measurement falls into two categories: contact and non-contact. Thermocouples and Pt 100 probes are the most common examples of contact measurement. In order to detect the temperature, the sensor must directly touch the object. In principle, these instruments measure their own temperature after they have adopted the temperature of the object, hence their relatively slow response time. Non-contact instruments detect the amount of infrared (IR) radiation which the object emits, are quick to respond and can be employed to measure temperatures of objects in movement or in a vacuum or difficult to access for other reasons.
Infrared thermometers, also called pyrometers, are sophisticated sensors which are today commonly employed in various fields, from research and devel-opment to industrial and manufacturing applications. This article aims to explain in a comprehensible manner the theory upon which this method of measurement is based and furthermore addresses how to deal with application-specific aspects which can influence the temperature reading.
Basics of infrared temperature measurement
Introduction
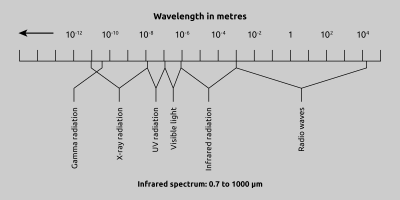
Fig. 1 Electromagnetic spectrum
Theory and Fundamentals
The spectrum of light was first discovered in 1666 by Sir Isaac Newton. While passing a beam of sunlight through a prism, he observed how the light separated into a band of colours, called a spectrum. In 1880 Sir William Herschel detected the relative energy of each colour He also discovered that energy existed beyond the red (visible) end of the spectrum. Around 1900, scientists Planck, Stefan, Boltzmann, Wien und Kirchhoff defined various aspects of the electromagnetic spectrum and formulated equations to describe infrared energy.
Infrared thermometers measure temperature by sensing the infrared energy which every material or object with a temperature above absolute zero (0 °K) will radiate. In the simplest configuration, a lens will focus the infrared radiation onto a detector which in turn will convert this energy into an electronic signal. After compensating for the ambient temperature this signal will be displayed as a temperature reading. This setup enables temperature measurement from a certain distance without requiring contact to the object. The infrared thermometer is thus suitable for measuring tasks for which thermocouples or other types of contact sensors would be inadequate or not sufficiently precise. Typical non-contact applications include very small or moving objects, current-carrying objects, aggressive chemicals, objects in a vacuum chamber or other type of sealed enclosure, as well as measurements in electromagnetic fields or applications requiring very fast response times.
The idea of an infrared thermometer had already existed in the 19th century. Charles A. Darling introduced his con-cepts in a book entitled “Pyrometry”, published in 1911.
The technology required to implement such an instrument was not available until 1930. Since then, infrared thermometers or pyrometers have been steadily improved and a wealth of knowledge and experience in many applications has been gained. Today, this concept is a standard temperature measuring technique and is employed for a broad scope of industrial and research applications.
Measuring Principle
As previously mentioned, all bodies with a temperature above 0 °K radiate infrared energy. Infrared radiation is the portion of the electromagnetic spectrum which lies between visible light and radio waves. The wavelength range of infrared radiation lies between 0.7 µm and1000 µm, as shown in Fig. 1. In practice however, within this broad range only wavelengths between 0.7 and 20 µm are suitable for measuring temperatures. Currently there are no detectors on the market which are sensitive enough to measure the small amount of energy radiated above 20 µm. The amount of energy emitted from a surface is proportional to the fourth power of the temperature of the surface.
The curve (fig. 2) depicts the energy which a black body with a temperature between 700 K and 1300 K radiates. One can see that the greatest portion lies beyond the visible range. Although IR radiation is not discernible to the human eye, it is helpful to imagine this radiation as being visible light, in order to appreciate how a pyrometer operates and understand the questions arising from various applications.
In many situations IR radiation actually behaves in the same manner as visible light. IR radiation travels from a source in straight lines and can be reflected or absorbed by obstacles in the radiation path. Most objects which are considered as opaque to the human eye will partially absorb and partially reflect a some of the incident radiation. This object, in turn, will radiate a portion of the energy it has absorbed and internally reflect a portion. This is even true for such materials which can be considered as being transparent such as glass, gaseous substances and thin transparent plastic films. However, with these materials, some of the radiant energy will also be transmitted through the object as illustrated in Fig. 3. These functions contribute to what is known as the emissivity factor of an object or material’s surface.
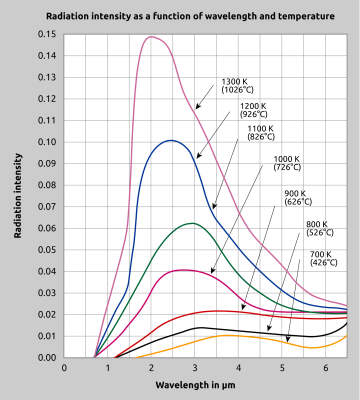
Fig. 2 Radiation properties of a black body
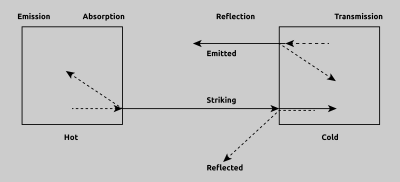
Fig. 3 Heat Exchange and radiation
The amount of energy an object will reflect and/or absorb is very dependent upon the nature of its surface (e.g. smoothness and texture). This is the case for both visible light and infrared radiation. This is of particular importance for non-contact temperature measurement of objects which are opaque to infrared radiation and have a low emissivity. An object made of polished stainless steel has a much lower emissivity than the same object with a rough texture. After machining, the surface of a metal object may have an uneven texture with tiny creases or grooves which will noticeably reduce the object’s reflectivity.
As can be derived from the law of con-servation of energy, the sum of the transmitted, reflected and emitted (ab-sorbed) IR energy must be equal to 1.
σλ + αλ + τλ = 1
Furthermore, the the spectral absorption factor is equal to the emissivity, or emis-sion factor:
ελ = αλ
Thus:
ελ = 1 - σλ+ τλ
As can be derived from the law of con-servation of energy, the sum of the transmitted, reflected and emitted (ab-sorbed) IR energy must be equal to 1.
σλ + αλ + τλ = 1
Furthermore, the the spectral absorption factor is equal to the emissivity, or emis-sion factor:
ελ = αλ
Thus:
ελ = 1 - σλ+ τλ
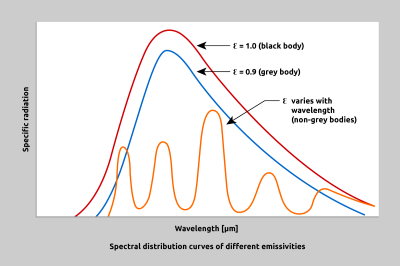
Fig. 4 Comparison of a black body, a grey body and a non-grey body (selective radiator)
This coefficient can be applied as a variable in Planck’s black body equation which describes an object’s radiation properties relative to wavelength. For non-transparent (opaque) objects, the equation is simplified as follows:
ελ = 1 - σλ
Objects through which IR radiation can neither reflect nor pass through are termed black bodies. No object in nature is a true black body. In theory, and for comparison purposes, a black body has an emissivity of 1.0. In actual practice, a black body conditions can be closely approximated with a light-impervious spherical cavity with a small cylindrical opening. The internal surface of such a cavity has an emissivity factor of 0.998.
The emissivity factor describes the ratio between the thermal radiation of a grey body and of a black body at the same temperature. An object which has a constant emissivity over all wavelengths and radiates less infrared energy than a black body is referred to as a grey body. Non-grey or selective radiators are objects, for example metals, whose emissivity varies with wavelength.
Different materials will generally have different emissivities, and thus, at a given temperature, will emit infrared energy at different intensities. In general, emissivity is not a function of colour, unless the emissivity of a paint substance differs from the emissivity of the painted object itself. An example of such an exception would be an object with a metallic lacquer coating containing a great amount of aluminium particles. Most paints and lacquers have the same emissivity, regardless of colour. The emissivity of aluminium, however, strongly differs from that of other paints so that an object with a metallic coating will also have a different emissivity.
Aside from the composition and surface texture of an object, a third factor will indirectly effect its emissivity: the spectral range of a sensor. The sensor’s spectral sensitivity will not actually influence the object’s ability to radiate energy, but rather how, or in which spectrum, the sensor is able to detect this radiation.
The temperature of materials such as glass, plastic or silicone which are partially transparent, must be measured using selective filters at specific wavelengths.
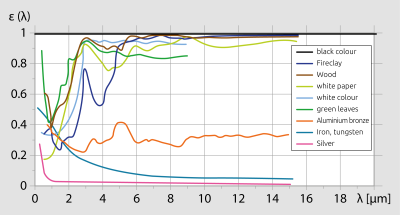
Fig. 5 Emissivity factor of various materials, depending on wavelength
The prior discussion makes clear that emissivity is an especially important parameter in infrared temperature measurement. A accurate temperature reading can only then be obtained when the object’s particular emissivity is known and taken into consideration. There are basically two methods for determining a material’s emissivity. The value can be gathered from data tables listing emissivities, or determined by comparative measurement. Because emissivities presented in data tables were often obtained under ideal laboratory conditions, these values rarely allow for ambient influences, which in practice can often lead to enormous deviations. Furthermore, these tables do not state the temperature and the wavelength which form the basis for the specified emissivity. Certainly such data tables are helpful as an approximation. In the comparison method, the object’s temperature is first measured using a thermocouple or other contact instrument. Then the pyrometer’s emissivitiy setting is adjusted so that the instrument shows the same temperature reading as the thermocouple. Generally speaking, most opaque, non-metallic materials have a relatively high and constant emissivity factor between 0.85 and 0.95. For most non-oxidised metal materials the emissivity ranges from 0.2 to 0.5, with the exception of gold, silver and aluminium whose emissivity is even lower. The ability of these metals to reflect ambient radiation is so high (equal to or greater than the object’s own emitted thermal energy) that it is therefore extremely difficult to measure their temperature using infrared thermometers.
Whereas it is almost always possible to determine an object’s emissivity, problems can arise when this value is not constant but rather fluctuates with temperature. This applies to most metals, however holds true for several other substances as well such as silicon or high purity, monocrystalline ceramics. For these materials, the comparison measurement and the instrument adjustment should be performed at the temperature crucial to the particular process.
The equations and formulas upon which temperature measurement is based were proven and established long ago. It is unlikely that a pyrometer user will ever be confronted with these formulas in day-to-day practice. However, a basic knowledge of these physical principles will enable a better understanding of how certain variables and parameters interact. This is a summary of the most relevant formulas:
1. Kirchhoff’s Law of Radiation
The emissivity ε of a body is equal to its absorptance α at a given temperature T and wavelength λ
e = α
It follows that, at the same given temperature, the radiant flux øλ of a real object equals the radiant flux of a black body øs multiplied by this object’s emissivity factor.
øλ = ε * øs
2. Stefan-Boltzmann Law
The total radiant flux per unit surface area emitted from a black body is proportional to the fourth power of its absolute temperature (ε = emissivity, A = radiating area, and k = constant)
P = k*ε *A*T4
3. Wien’s Displacement Law
states that there is an inverse relationship between the wavelength of the peak of the emission of a black body and its temperature. In other words, the hotter an object is, the shorter the wavelength at which it will emit most of its radiation. (Wien’s displacement constant = 2.89)
λmax = 2.89 * 103 μmK/T
4. Planck’s Radiation Law
describes the relationship between wavelength, temperature and radiant power

Configuration of an infrared thermometer
An infrared thermometer is made up primarily of the following components
1. A lens which collects the emitted thermal radiation from a defined surface.
2. A detector which converts this energy into an electronic signal.
3. An emissivity correction feature, so that the instrument can be adjusted according to properties of the target material.
4. A compensation feature for ambient temperature which prevents the detector from factoring the instrument’s own temperature into the output signal.
For many years most commercially available IR thermometers were configured according to this concept. These instruments were only suitable for a limited number of applications, and in retrospect, the measurement results they provided were less than satisfactory. However, these instruments were very rugged, and by the standards of the time, were considered adequate.
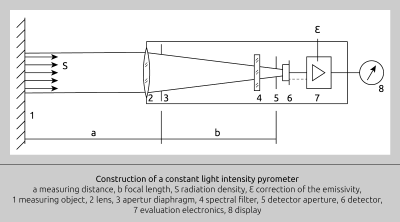
Fig. 6 Block diagram of an IR thermometer
Modern IR thermometers have been developed on this original concept. Over time though, they have become much more sophisticated than predecessor models. The most important develop-ments include a variety of special detec-tors, selective IR signal filtering, linearization and amplification of the detector signal as well as standardized temperature output signals, e.g. 4–20 mA or 0–10 V DC. Fig. 6 shows a block diagramme of a modern infrared pyrometer.
The introduction of selective filters for IR radiation is probably the most significant improvement in infrared temperature measurement. This technology has enabled the employment of more sensitive detectors and more stable signal amplifiers. As opposed to earlier IR thermometers which relied on a broad IR spectrum in order to obtain a usable detector output signal, a modern detector can manage quite well with bandwidths as small as 1 µm. For certain applications, spectral restriction or specific wavelength selection is imperative because it is necessary to measure through a medium without incorporating the temperature of this medium’s carbon or hydrogen impurities. Furthermore, some objects or gaseous substances have a broad infrared transparency range. Some applications which require wavelength definition or range limitation are:
· 8 - 14 μm: precludes ambient humidity from influencing the measurement, even over relatively long distances.
· 7.9 μm: enables temperature measurement of thin plastic films which would otherwise be transparent for most of the IR spectrum.
· 3.86 μm: effectively prevents carbon dioxide or water vapour in flames or exhaust fumes from interfering with the measurement.
An important consideration in wavelength selection is the temperature range of the target object. As illustrated in Fig. 2, Planck’s equation shows us that as the temperature decreases, the peak of the black body radiation curve moves to lower intensities and longer wavelengths. Even for applications which do not inherently require spectral range restriction, it is always wise to perform the measurement at the shortest feasible wavelength. One advantage of doing so is based on the fact that the emissivity of many materials, especially of metals, is highest at shorter wavelengths. Another advantage of restricting the wavelength range for a measuring task is accuracy. A sensor with a narrow spectral range will be less sensitive to emissivity fluctuations during the measurement and will thus produce a more accurate temperature reading, as demonstrated in Fig. 7.
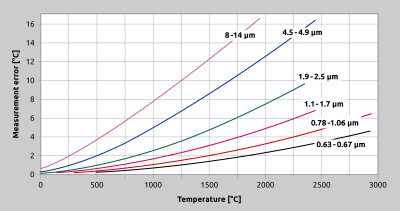
Fig. 7 Effect of an incorrect emissivity setting at various wavelengths
Mechanical Design
IR thermometers are designed in a variety of configurations. These will vary according to optical system, electronics, applied technology, size and type of enclosure. What these instruments have in common is their signal processing chain which begins with an IR signal and ends with an electronic output signal. The process sequence starts with an optical system made up of either lenses or a fibre optic cable plus filters and a detector.
The performance of the optical system, i.e. the size of the measured spot at a given distance, is decisive for each application. The optical resolution can be defined as the ratio between the distance of the sensor from the target object, and the diameter of the measured spot. Pyrometers either have fixed focus or fo-cusable optics. Instruments with a fixed focus optical system will only produce a sharp image of the target at the focal point. At any other distance, the target spot diameter will increase disproportionately compared to the distance ratio. Such instruments are suitable for target objects with large surface areas. Pyrometers with focusable optics are recommended for measuring small objects or at greater distances to the target. These instruments can be employed with much greater flexibility because they can be adjusted according to the measuring distance.
When comparing the printed technical specifications of various pyrometers, it is important to know the percentage of detected radiation upon which the stated spot diameter is based. For example, a measurement spot based on 98 % of the object’s total thermal energy can be significantly larger than a measurement spot based on only 90% of the energy. This can lead to considerable errors in the temperature reading, especially for small target objects hardly larger than the pyrometer’s measuring spot.
Another aspect of the optical system is correct target spot sighting. Instruments which do not feature any sort of visual help or sighting device will have their lens fixedly aligned toward the surface area of the measured object. This is acceptable for stationary sensors, or for objects having adequately sized surfaces not requiring a pinpoint measurement. For applications involving very small targets, or when measuring at greater distances to the target, an aiming assistance such as a through-the-lens sighting device, a spot light or a laser beam will be indispensable.
A pyrometer’s specific sensitivity will depend on the detector or filters em-ployed. Fig. 8 shows how PbS (lead sulphide) detectors have the highest sensitivity and thermopiles the least sensitive. Most sensors function in one of two ways: either based on the photoelectric effect (incident radiation produces a voltage signal) or according to photoconductivity (incident radiation changes the resistance).
Because objects at low temperatures radiate relatively small amounts of thermal energy at relatively long wavelengths, these applications call for pyrometers with broad spectral ranges. For high-temperature applications, the spectral sensitivity is considerably restricted by applying narrow-band filters. Configuring a pyrometer to measure only within a small wavelength band is the most effective technique for minimising the potential interference of extraneous radiation at other wavelengths.
For optimal IR sensor responsiveness, the pyrometer manufacturer must allow for the spectral sensitivity as well as the characteristic curve of the employed detector.
The instrument’s electronics linearises the detector’s output signal to generate either a linearised output current 0 (4) – 20 mA or a linearised output voltage 0(2) – 10 V. Frequently the linearisation will be carried out by the microprocessor’s software. Compared to analogue linearisation, the advantage of this method is a broader temperature measuring range and greater accuracy.
The signal can be converted to a digital signal and transmitted to a digital interface for further processing. Alternatively, a number of devices such as a display unit, a data recorder, a PLC or other control unit can serve as the primary output of the IR thermometer’s data. Depending on specific model, an IR thermometer might also feature an alarm, an adjustable minimum/maximum memory for intermittent measurements, adjustable intervals and response times as well as a sample-and-hold function.
As already mentioned, the advantage of non-contact measurement techniques is the very short response time. The thermoelectric detectors employed for low temperature ranges have a response time of about 30 ms. Instruments for high temperature ranges using photoelectric detectors have a response time of approximately 2 ms.
When an application requires a fast responding sensor, all other components of the control loop must also have adequate processing or control speeds.
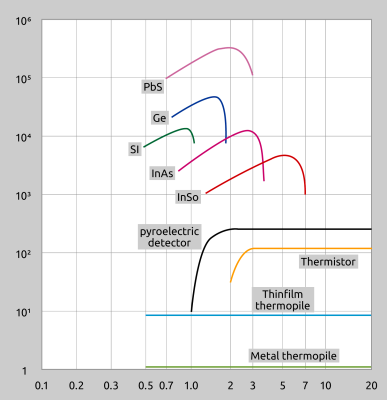
Fig. 8 Spectral curve of various sensors
Monochromatic Measurement: measuring temperature at one wavelength
With monochromatic temperature measurement, the thermal energy radiating from a surface is detected at one specified wavelength. The design of such instruments can vary anywhere from a handheld device with a simple external display to a highly sophisticated portable instrument whose viewfinder will show the temperature reading as well as the target image. Some models feature a memory function as well. The range of stationary online sensors covers simple, small detectors with external electronics up to rugged, complex component assemblies with integrated PID controllers. Optional features such as fibre optics, through-the-lens sighting, laser spotlight aiming, water cooling and scanner systems can be useful for system control or process monitoring. Nowadays even pyrometers with an integrated video camera are available, which enable the measurement position to be monitored from the control room while the pyrometer is in operating. The many instrument varieties available can greatly differ with respect to size, ruggedness, flexibility and signal processing.
Every application or project employing pyrometers will have its own set of criteria; the most important factors to be considered when evaluating the suitability of an instrument include sensor configuration, filters, temperature range, optics, response time and emissivity.
When choosing a pyrometer’s IR spectral sensitivity and temperature range, they must always be regarded in connection with the specifics of the application. The spectral curves illustrated in Fig. 2 show how short wavelengths are best for high temperatures, whereas low temperatures should generally be measured at longer wavelengths. When, however, the object to be measured is transparent (e.g. glass or plastic films), the task calls for a narrow band filter. Polyethylene film, for example, will absorb/emit energy at 3.43 µm because it is IR-opaque at precisely that wavelength. Likewise, many glass-like materials are impervious to light at around 5 µm. Conversely, a sensor used with a filter for a spectral range below 2 µm will enable measurement through the glass object, to pick up radiation from beyond the glass, for applications such as measurements in a vacuum or pressure chamber. Another option for measuring within closed chambers, in cramped conditions or at high ambient temperatures is the use of fibre optic cables.
Infrared temperature measurement at a single wavelenght is a technique which, although very simple, is quite versatile. This method is sufficient for numerous applications in which temperature control is essential for ensuring that product quality remain constant.
Ratio measurement: obtaining temperatures at two or more wavelengths
Considering that a surface’s emissivity will greatly influence the accuracy of temperature measurement using infrared thermometers, and that, in addition, obstructions or particles might exist in the optical path, it is not surprising that applied research has been pursuing ways to develop sensors which are unsusceptible to these kinds of interference. A well-proven and widely-used technique is a ratio or multicolour measurement. This method - instead of measuring the absolute amount of thermal radiation at one particular wavelength - detects the energy at two different wavelengths and calculates the ratio of the two to produce a temperature reading. The term “multicolour” stems from a time during which a misconception prevailed about the relationship between temperatures and visible colours. Although this notion is now outdated, the term is still commonly used.
The effectiveness of this measuring concept is based on the premise that any changes in the target object’s surface characteristics, or any obstructing particles in the pyrometer’s optical path, will be detected by both sensors to the same degree. Consequently, the ratio between the two sensor output signals will remain consistent, and thus the two temperature readings will remain identical. In a simplified form, Fig. 9 illustrates a pyrometer which operates according to this concept.
The effectiveness of this measuring concept is based on the premise that any changes in the target object’s surface characteristics, or any obstructing particles in the pyrometer’s optical path, will be detected by both sensors to the same degree. Consequently, the ratio between the two sensor output signals will remain consistent, and thus the two temperature readings will remain identical. In a simplified form, Fig. 9 illustrates a pyrometer which operates according to this concept.
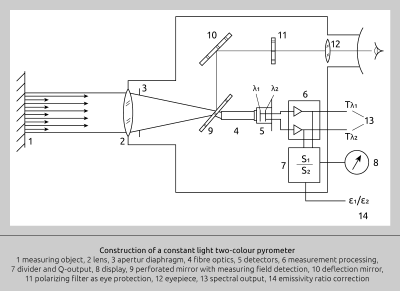
Fig. 9 Ratio measurement
By measuring the ratio of two intensities, rather than the absolute temperature, an error—for instance resulting from a target’s unknown or fluctuating surface emissivity—can be avoided. A precise and reliable temperature reading can be obtained even when the pyrometer’s field of view is impaired by colder materials such as dust and steam, or partially obstructed by a furnace inspection window or other machinery and equipment.
As long as the medium between the target object and the sensor does not selectively dampen specific wavelengths, the ratio of the two signals, and thus the temperature reading obtained, will remain consistent.
Therefore, this method is especially suitable for applications which are impossible or difficult to tackle by other means. Examples include temperature measurement within cement kilns, or through inspection windows which might fog up, something that often occurs when measuring molten metal in a vacuum chamber. Keep in mind, however, that both of the pyrometer’s sensors must be able to detect such dynamic factors and atmospheric or other interferences in the sight path in equal measure, in other words, signal attenuation must be the same at all wavelengths.
Of course this method can prove to be inadequate for some applications. A ratio or two-colour measurement is not suitable for non-gray bodies such as aluminium. Similarly, a ratio pyrometer cannot be used to measure through hot Pyrex glass. This technique has the tendency to detect thermal energy from behind the targeted surface, when the background temperature is hotter than the measured target object.
Fig. 10 shows examples of various products whose emissivity changes according to temperature. Graphite is commonly described as a material having a high and very constant emissivity factor although the opposite is actually true. The emissivity of graphite, within a temperature range from 20 °C to 1100 °C, increases from 0.4 to 0.65. Multicolour thermometers can be employed for non-gray bodies, whose emissivity factor varies at different wavelengths. These instruments measure temperature at a number of different wavelenths. Such applications require an in-depth analysis of the surface characteristics of the product to be measured. The relationship between emissivity, temperature, wavelength and surface properties must be scrutinised and defined by an algorithm in order to make a cohesive statement about the radiation at different wavelengths and temperature.
The ratio between temperature values will also be distorted when the pyrometer’s field of view contains a medium whose particle size coincides with the wavelength used for the measurement.
Despite these restrictions, the ratio measurement is a technique that works very well for many applications. For some measuring tasks, this is not only the better method, but rather the only solution feasible for obtaining accurate temperature readings.
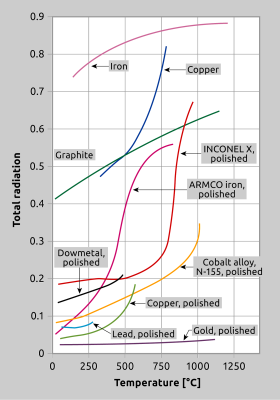
Fig. 10 For many materials, emissivity will change with temperature. This illustration depicts several commonly measured materials.
Summary
Fig. 11 depicts once more the basic elements involved in a temperature measurement application. The most important aspect is the surface of the targeted object. Factors which will affect the suitability of a measuring instrument include target size, temperature range, emissivity factor, spectral sensitivity and response time.
Aside from these criteria, it is necessary to consider ambient conditions at the measurement location in order to determine whether a pyrometer is ideal for an application. Conditions such as the flames, IR radiant heaters, induction furnaces or the the presence of dust, smoke, steam or other particles on the lens or in the atmosphere must be considered.
Aside from these criteria, it is necessary to consider ambient conditions at the measurement location in order to determine whether a pyrometer is ideal for an application. Conditions such as the flames, IR radiant heaters, induction furnaces or the the presence of dust, smoke, steam or other particles on the lens or in the atmosphere must be considered.
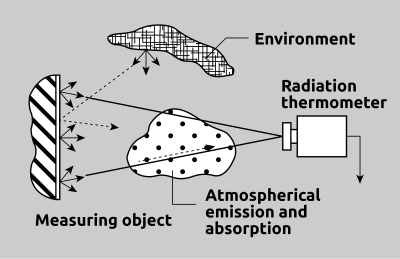
Fig. 11 Interfering influences
Infrared temperature measurement is a sophisticated, well-engineered technology which is continuously being improved and expanded to adapt to new applications. Numerous diverse industrial sectors as well as the research and development community have come to rely on pyrometrical methods on a daily basis. With the proper knowledge of the underlying technology and an understanding of the relevant application parameters, this method peforms well to achieve the desired results, provided that the instrument has been carefully installed. In this context, the sensor must be employed according to its specifications, and that no effort has been spared to keep the pyrometer’s optical system free of contamination.
To that end, one should consider the availability of protective and mounting accessories or other supplementary enhancements. Furthermore, when contemplating a purchase, one should make sure that these accessories permit the instrument dismounting or sensor exchange. When these fundamental principles are observed, modern infrared thermometers will function in most applications more reliably than thermocouples or PT100 temperature sensors.
To that end, one should consider the availability of protective and mounting accessories or other supplementary enhancements. Furthermore, when contemplating a purchase, one should make sure that these accessories permit the instrument dismounting or sensor exchange. When these fundamental principles are observed, modern infrared thermometers will function in most applications more reliably than thermocouples or PT100 temperature sensors.


